
Planting
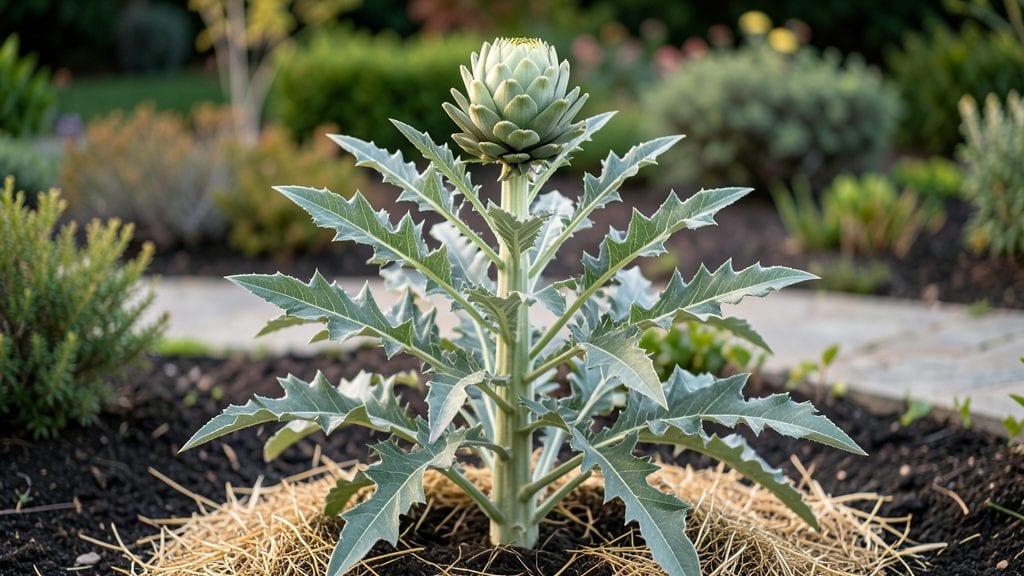
Growing artichokes from seed to harvest is one of those gardening victories that feels like cheating—thick, glossy leaves and those prized buds that look like alien sculptures. 🌱 I planted my first batch last spring and ended up with enough artichokes to share with neighbors, all from a single packet of seeds.
The key isn't some secret technique; it's matching their Mediterranean roots to your garden's conditions.
You'll need a sunny spot with at least 6 hours of direct light daily, well-draining soil rich in organic matter, and patience—artichokes take 90-140 days to mature. The real game-changer is consistent moisture; these plants drink like they're in a desert and hate having wet feet.
Start seeds indoors 8-10 weeks before your last frost, then transplant when soil warms to 60°F—no rushing this step.
By harvest time, you'll be snapping off those tight, fuzzy buds before they open into flowers, revealing the tender hearts inside. The flavor? Nutty, slightly artichoky, and worth every bit of care.
My first harvest was small but satisfying—now I'm planning a bigger patch for next year. The best part? You can freeze or pickle the extras, so nothing goes to waste.
Works beautifully in USDA Zones 7-10, though container growing extends the range for cooler climates. Even if you've never grown artichokes before, this method is forgiving once you understand their basic needs. Let's get those seeds started—the payoff is worth the wait.
📚 In This Guide
- What you need
- Instructions
- Tips and common mistakes
- Wrapping up and next steps
What you need
- ● Artichoke Seeds or Seedlings: 10–20 Globe artichoke seeds (or 3–5 nursery-grown seedlings for faster results). Choose varieties like 'Green Globe' or 'Imperial Star' for best yields.
- ● Soil: Well-draining, loamy soil with a pH of 6.5–7.5 (test your soil or amend with compost if needed).
- ● 1–2 bags of high-quality compost (per 10 sq ft of garden bed).
- ● Fertilizer: Balanced 10-10-10 fertilizer (1–2 lbs per 10 sq ft) or organic options like fish emulsion or bone meal.
- ● Garden Space: Full sun (6–8+ hours of direct sunlight daily).
- ● Spacious bed or raised planter (artichokes need 3–4 feet of space between plants).
- ● Tools: Trowel or transplanting spade
- ● Garden fork (for loosening soil)
- ● Watering can or hose with a gentle spray nozzle
- ● Pruners (for trimming dead leaves or harvesting)
- ● Mulch (straw or wood chips) to retain moisture and suppress weeds.
- ● Row covers or netting to protect seedlings from pests (like slugs or rabbits).
- ● Cage or stakes for tall varieties (e.g., 'Romanesco') to prevent flopping.
- ● pH test kit (to monitor soil acidity/alkalinity).
- ● Slow-release fertilizer tablets (for container growing).
Step-by-Step instructions for cultivating a thriving artichoke garden
Here’s how I transform delicate artichoke seedlings into robust plants yielding those prized buds.
🌱 Step 1: Prepare Soil and Plant Seeds Indoors
Artichokes need a head start—start seeds indoors 8-10 weeks before your last frost date. Fill 4-inch pots with sterile seed-starting mix (never garden soil—it’s too dense). Press the mix down lightly so it’s firm but not compacted. Moisten it until it’s damp but not soggy.
Sow 2-3 seeds per pot at a depth of ¼ inch—deeper planting delays germination. Cover the pots with plastic wrap to retain warmth and humidity, then place them in a warm spot (70-75°F). Germination takes 10-20 days, so patience is key. Once sprouts appear, remove the wrap immediately to prevent damping-off.
☀️ Step 2: Provide Optimal Light and Harden Off Seedlings
Artichokes crave light—give seedlings 14-16 hours of bright light daily using a grow light placed 2-3 inches above them. Without enough light, seedlings stretch leggy and weak. You’ll know they’re thriving when they develop thick stems and deep green leaves with compact spacing between nodes. Rotate pots weekly to prevent leaning.
Two weeks before transplanting, start hardening off seedlings. Place them outside in a sheltered spot for 1-2 hours the first day, gradually increasing time over 10-14 days. This toughens stems and leaves so they survive the garden’s conditions. Avoid full sun during this period—it can scorch tender foliage.
🪴 Step 3: Transplant to a Sun-Drenched Garden Bed
Choose a full-sun location with well-draining soil—artichokes hate soggy roots. Amend the soil with 2-3 inches of compost mixed into the top 6 inches to enrich it. Dig holes twice as wide as the root ball but no deeper. Space plants 3 feet apart in rows 4 feet apart—this gives them room to grow into sturdy, productive bushes.
Transplant on a cool, overcast day to reduce stress. Water deeply at the base, then mulch with 2-3 inches of straw or wood chips to retain moisture and suppress weeds. Avoid overhead watering—it spreads disease. Instead, water at the soil line, keeping it consistently moist but never waterlogged.
🌿 Step 4: Fertilize and Prune for Maximum Yield
Feed plants with a balanced fertilizer (10-10-10) when buds form, then again 6-8 weeks later. Too much nitrogen early on encourages leafy growth at the expense of buds. I also side-dress with compost mid-season to keep nutrients flowing. Watch for yellowing leaves—this signals nutrient deficiency or overwatering.
Prune aggressively to encourage bushier growth. Remove flower buds on the first year’s growth—they’ll rob energy from root development. In the second year, let 2-3 buds per stem develop into artichokes. Pinch back tender shoots to redirect energy to the main stems. You’ll see stronger, more productive plants within weeks.
⏰ Step 5: Harvest at Peak Maturity
Harvest artichokes when buds are firm, compact, and still tightly closed—usually 80-100 days after transplanting. Use a sharp knife to cut the stem 1-2 inches below the bud. If left too long, buds open into thistles and become tough. Harvest in the morning when buds are crisp and full of flavor.
After harvest, keep plants well-watered and fertilized for a second flush of buds. In colder climates, artichokes are perennial—they’ll return year after year if protected with mulch and row covers in winter. I’ve seen my plants thrive for 5+ years with proper care. Enjoy those globe-shaped treasures!
Tips & tricks for perfect artichoke garden cultivation
Transforming delicate artichoke seedlings into thriving plants requires precision—and these pro tips will help you avoid the most common pitfalls along the way.
Lighting Secret: In Step 2, when you're providing that critical 14-16 hours of light daily, consider supplementing with a full-spectrum LED grow light if your natural light falls short. Position it just 2-3 inches above the seedlings to prevent leggy growth. I've found that rotating pots weekly helps prevent uneven growth patterns—trust me, your plants will thank you with those thick, sturdy stems you're aiming for.
Germination Rescue: If your seeds in Step 1 aren't sprouting within the expected 10-20 days, don't give up! First check that your warm spot maintains a consistent 70-75°F temperature—fluctuations can delay germination. I've also had success lightly misting the soil surface daily while keeping the plastic wrap in place, which helps maintain that crucial humidity without creating soggy conditions that lead to damping-off.
Transplant Timing: The 8-10 week indoor growing period in Step 1 might seem long, but it's non-negotiable for most climates. If you're in a warmer region where your last frost comes earlier, you can safely reduce this to 6-8 weeks. The key is ensuring your seedlings have developed those thick stems and compact nodes before transplanting—this gives them the strength to establish quickly in the garden bed.
Harvest Visual Cue: When harvesting in Step 5, look for buds that are firm to the touch with tightly closed scales—this is your perfect window. I've learned to harvest in the morning when buds are at their crispest. If you're unsure, gently squeeze the bud—it should feel like a tightly wrapped package, not a soft balloon. This visual and tactile check prevents those tough, thistle-like buds that can ruin your harvest.
Pro Tips for Artichoke Garden Plant
- Transforming delicate artichoke seedlings into thriving plants requires precision—and these pro tips will help you avoid the most common pitfalls along the way.
- Lighting Secret: In Step 2, when you're providing that critical 14-16 hours of light daily, consider supplementing with a full-spectrum LED grow light if your natural light falls short.
- Germination Rescue: If your seeds in Step 1 aren't sprouting within the expected 10-20 days, don't give up!
Frequently asked questions
Got questions about growing your own artichoke garden? You’re not alone! Here are some of the most common queries—plus straightforward answers to help you cultivate a thriving patch of these delicious, edible flowers.
How long does it take for artichoke plants to grow from seed?
Artichokes are patient plants! From seed, expect 120–150 days to harvest, depending on the variety. Start seeds indoors 10–12 weeks before your last frost, then transplant seedlings outdoors. Pro tip: Choose early varieties like ‘Green Globe’ for faster rewards (as early as 90 days).
Can I grow artichokes in cold climates?
Artichokes thrive in USDA Zones 7–10, but don’t give up if you’re in a cooler zone! Try growing them in containers and overwinter them indoors, or opt for cold-hardy varieties like ‘Purple of Rome.’ Mulch heavily in winter to protect roots. Bonus: Greenhouse growing extends your season significantly.
What pests or diseases should I watch for?
Keep an eye out for aphids, slugs, and earwigs, which love artichoke leaves. Use row covers early on for prevention. Fungal issues like powdery mildew can strike in humid climates—improve airflow and avoid overhead watering. Quick fix: Spray neem oil at the first sign of trouble.
Are there artichoke alternatives if I can’t grow them?
If artichokes seem too finicky, try cardoon (their close relative) or globe artichoke substitutes like sunchokes (Jerusalem artichokes) or Romanesco broccoli for a similar texture. For flavor, fennel or asparagus can add a mild anise-like note to dishes.
When is the best time to harvest artichokes?
Harvest when buds are firm but still tight, before the tips start opening (usually 8–12 weeks after flowering). Use a sharp knife to cut the stem cleanly. Pro move: Harvest in the morning for the freshest flavor—store unwashed in the fridge for up to 5 days.
Wrapping up and next steps
Growing your own artichoke garden plant is a rewarding journey that combines patience, care, and a touch of Mediterranean flair! 🌱 From selecting the right variety to nurturing your plants through every stage—soil prep, watering, and pest management—you’re now equipped with all the essentials.
Whether you’re a seasoned gardener or a curious beginner, the satisfaction of harvesting your first homegrown artichokes is well worth the effort.
Ready to take the next step? Start by marking your calendar for planting season (spring or fall, depending on your climate) and gather your supplies. Then, roll up your sleeves and let your artichoke garden plant thrive—one bud at a time! 🌿