Tools
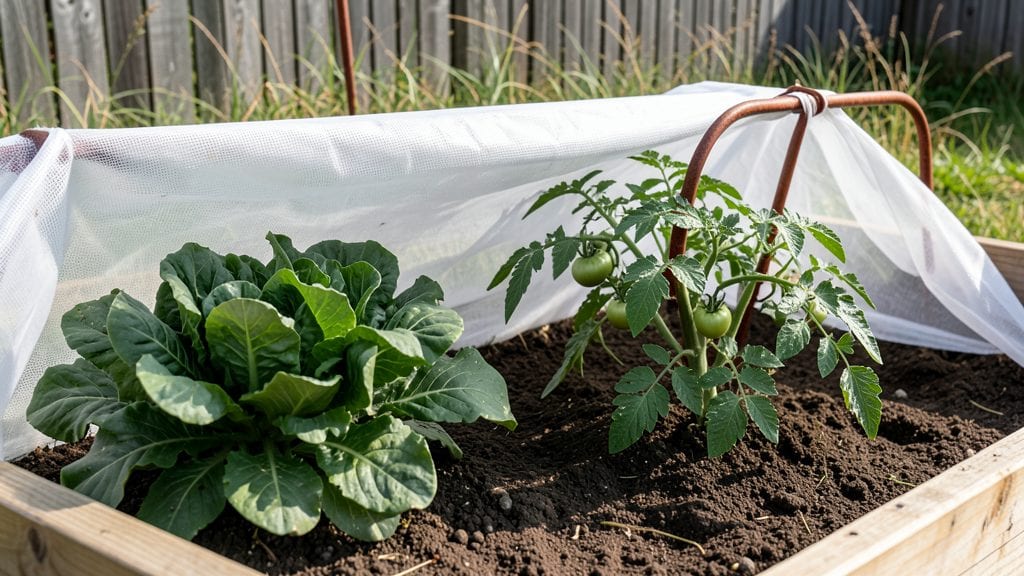
My vege garden protection system saved last season’s harvest from deer, squash bugs, and a freak hailstorm—all without chemicals or expensive traps. The key is layering defenses like a puzzle, where each piece covers a different threat before it becomes a problem.
I started with physical barriers—row covers for early spring, bird netting for berries, and a sturdy fence that kept rabbits out after dark. It wasn’t pretty, but it worked.
You don’t need a farm budget to pull this off. A few $10-$20 supplies—like lightweight floating row covers, wire mesh, and repurposed hardware cloth—create a fortress for your plants.
Add a homemade garlic spray for soft-bodied pests and companion plants like marigolds to deter nematodes, and you’ve got a foolproof defense system. The best part? It’s adjustable as seasons change—no more scrambling when pests strike.
By summer’s end, you’ll have vibrant green plants thriving under their protective layers, with fewer holes in leaves and zero lost crops to weather or critters.
The peace of mind alone makes it worth the effort, especially when you’re standing over a bountiful harvest that would’ve been ruined without these simple steps. Let’s break down how to set it up right the first time.
This approach works for small urban plots, raised beds, or half-acre farms—just scale the materials. The same principles apply whether you’re guarding tomatoes from hornworms or protecting lettuce from late frosts.
Here’s exactly what to use and when to deploy it for maximum effectiveness without breaking the bank.
📚 In This Guide
- What you need
- Instructions
- Tips and common mistakes
- Wrapping up and next steps
What you need
- ● Fencing or Netting: 1–2 rolls of pest-proof mesh netting (1/4"–1/2" mesh, 6–8 ft tall, depending on pests like rabbits or deer).
- ● 1–2 rolls of fine mesh row covers (for insects like aphids or cabbage moths; 30–50% shade cloth if needed).
- ● Physical Barriers: 10–20 ft of hardware cloth (1/4" mesh) for underground burrowing pests (e.g., gophers).
- ● 2–4 ft tall chicken wire or wire mesh (for lightweight protection against birds or small mammals).
- ● Organic Repellents: 1–2 gallons of neem oil or garlic/pepper spray (for foliar pests).
- ● 5–10 lbs of diatomaceous earth (food-grade) (sprinkle around plant bases).
- ● Weather Protection: 1–2 hoop houses or low tunnels (6–8 ft wide, 3–4 ft tall; use PVC pipes + row covers).
- ● 10–20 ft of burlap or shade cloth (30–50% shade for heat protection).
- ● Reflective tape or old CDs (hang near gardens to deter birds).
- ● Compost or mulch (3–4 inches thick to suppress weeds and retain moisture).
- ● Motion-activated sprinklers (for large gardens to scare off deer or rabbits).
- ● Beneficial insect habitats (e.g., ladybug houses or bee boxes to encourage natural predators).
Instructions for building a resilient vegetable garden protection system
Here's how to create a multi-layered defense that keeps your vegetables thriving through pests and unpredictable weather.
Establish Physical Barriers Against Soil-Borne Pests
Lay down a 4-6 inch layer of landscape fabric over the garden bed before adding soil. This prevents burrowing insects, weeds, and rodents from accessing your plants from below. Secure the edges tightly with landscape staples or heavy rocks to avoid gaps where pests could slip through.
For raised beds, line the bottom with hardware cloth (at least 1/4-inch mesh) before adding soil. This extra layer blocks moles and voles while still allowing water and air to penetrate. I've found that cutting the fabric to fit snugly around bed edges eliminates wrinkles that could trap moisture and invite fungal issues.
Create a Floating Row Cover Framework
Construct a hoop house structure using 5-foot PVC pipes bent into arches and spaced 3 feet apart. Secure the arches with T-posts driven into the ground at each end. This creates a sturdy framework that can support lightweight floating row covers while allowing airflow and sunlight.
For smaller gardens, use wire hoops made from 18-gauge galvanized wire bent into 2-foot diameter circles. These are lighter, easier to handle, and still provide excellent protection against flying insects. The key is keeping the hoops 3-4 inches above the plants to allow for growth while maintaining coverage.
Install Netting for Flying Insect Protection
Drape fine mesh insect netting (with 1/8-inch or smaller openings) over the hoop house structure, securing it tightly with binder clips or zip ties at the edges. This creates a physical barrier that prevents aphids, whiteflies, and cabbage moths from reaching your plants while still allowing 90% of sunlight to penetrate.
For windy conditions, weigh down the edges with brick or sandbags to prevent flapping. I've learned the hard way that even a small gap can let in enough pests to devastate a crop. Check the netting weekly for tears and repair immediately—small holes expand quickly when exposed to wind and rain.
Implement Mulch and Trap Cropping Strategies
Apply a 3-4 inch layer of organic mulch (such as straw or shredded leaves) around the base of plants. This suppresses weeds, retains moisture, and deters crawling insects by breaking their access to the soil. The mulch also creates a microclimate that helps regulate soil temperature during extreme weather.
Plant sacrificial trap crops like nasturtiums or radishes at the garden's perimeter. These attract pests away from your vegetables while being easy to replace. I've had great success using marigolds interspersed among tomato plants—their strong scent repels many common garden pests naturally.
Set Up Weather-Responsive Protective Measures
Install adjustable shade cloth (with 30-50% shade coverage) on the hoop house structure to protect plants from intense afternoon sun or heatwaves. This is particularly important for leafy greens that can bolt quickly in hot conditions. Secure the shade cloth with clips that allow easy removal when full sun is needed.
For frost protection, drape clear plastic sheeting over the hoop house and secure it tightly. This creates a mini greenhouse effect that can raise temperatures by 10-15°F overnight. Leave the ends slightly open for ventilation during the day to prevent condensation buildup, which can promote fungal diseases.
Tips & tricks for building a resilient vegetable garden protection system
A few strategic adjustments can transform your garden's defense from good to impenetrable. Here's what I've learned after years of battling pests and unpredictable weather.
Layering Matters: The key to this system is redundancy—each layer serves a specific purpose while supporting the others. For instance, the 4-6 inch landscape fabric in Step 1 blocks soil-borne pests, but pairing it with the 1/4-inch hardware cloth in raised beds creates a double barrier that even determined moles can't penetrate. I've seen firsthand how this layered approach prevents issues that would otherwise require chemical intervention.
Framework Stability: When constructing your hoop house in Step 2, prioritize stability over aesthetics. The 5-foot PVC pipes spaced 3 feet apart should be secured with T-posts driven at least 12 inches deep into firm soil. I've had hoops collapse during windstorms when they weren't properly anchored—this is particularly critical in areas prone to heavy winds or late-season storms. For wire hoops, bend them into perfect circles using heavy-duty pliers to maintain consistent coverage.
Netting Maintenance: The 1/8-inch insect netting in Step 3 requires weekly inspections, especially after rain or wind. I keep a small roll of heavy-duty tape on hand to patch tears immediately. What I've found works best is marking the netting with a fabric marker before installation—this helps track any new holes that develop. Remember, even a small tear can become a gateway for thousands of pests in just a few days.
Microclimate Management: The 3-4 inch organic mulch in Step 4 isn't just about weed suppression—it's a temperature regulator. In my experience, this layer can keep soil temperatures 5-10°F cooler during heatwaves and 3-5°F warmer during cool nights, creating optimal growing conditions. For extreme climates, consider adding a second layer of mulch during peak summer months to further stabilize temperatures.
Pro Tips for Vege Garden Protection
- A few strategic adjustments can transform your garden's defense from good to impenetrable.
- Layering Matters: The key to this system is redundancy—each layer serves a specific purpose while supporting the others.
- Framework Stability: When constructing your hoop house in Step 2, prioritize stability over aesthetics.
Frequently asked questions
Got questions about keeping your veggie garden safe from pests and the elements?
You’re not alone! Here are answers to the most common concerns—so you can protect your hard work with confidence.
What’s the best first line of defense against garden pests?
Start with physical barriers like row covers, mesh netting, or raised beds. These block pests while letting sunlight and water through. For soft-bodied insects (like aphids), a strong spray of water can also work wonders! Combine barriers with crop rotation to confuse pests long-term.
When should I apply protective measures—before planting or after?
Always prepare before planting! Install fences, trellises, or mulch early to deter pests and improve soil health. For weather protection (like frost cloth), set up temporary covers 2–3 weeks before the first expected frost. After planting, monitor for signs of pests or damage and adjust barriers as needed.
Are there budget-friendly alternatives to expensive garden protection tools?
Use DIY solutions like:
- Egg cartons as seed starters
- Chicken wire or old fabric for makeshift cages
- Homemade sprays (e.g., neem oil or garlic-chili mix)
- Plant companions (e.g., marigolds to repel nematodes)
What do I do if pests already infested my garden?
Act fast! Isolate affected plants and remove heavily damaged leaves. Introduce natural predators (like ladybugs for aphids) or use organic pesticides (e.g., insecticidal soap). For soil pests, rotate crops next season and add compost to boost plant resilience. Prevention is key—once pests take hold, recovery takes time!
How do I protect my veggies from extreme weather (heat, rain, hail)?
Use weather-specific shields:
- Heat waves: Shade cloth (30–50%) or mulch to retain moisture.
- Heavy rain: Raise containers or use tarps to prevent waterlogging.
- Hail: Cover plants with sturdy fabric (like old bedsheets) secured with bricks.
Still stumped? Drop your specific pest or weather challenge below—we’ve got more tips to share!
Wrapping up and next steps
Protecting your veggie garden doesn’t have to be complicated—just strategic! 🌱 By layering physical barriers, natural deterrents, and smart maintenance, you’ll shield your plants from pests, harsh weather, and even curious critters.
Whether you’re using row covers, companion planting, or DIY solutions, every step brings you closer to a thriving, low-stress harvest.
Now that you’re armed with the best tools and tips, take action this weekend! Start small—try one new barrier or deterrent—and watch your garden flourish. Happy growing! 🌿