
Tools
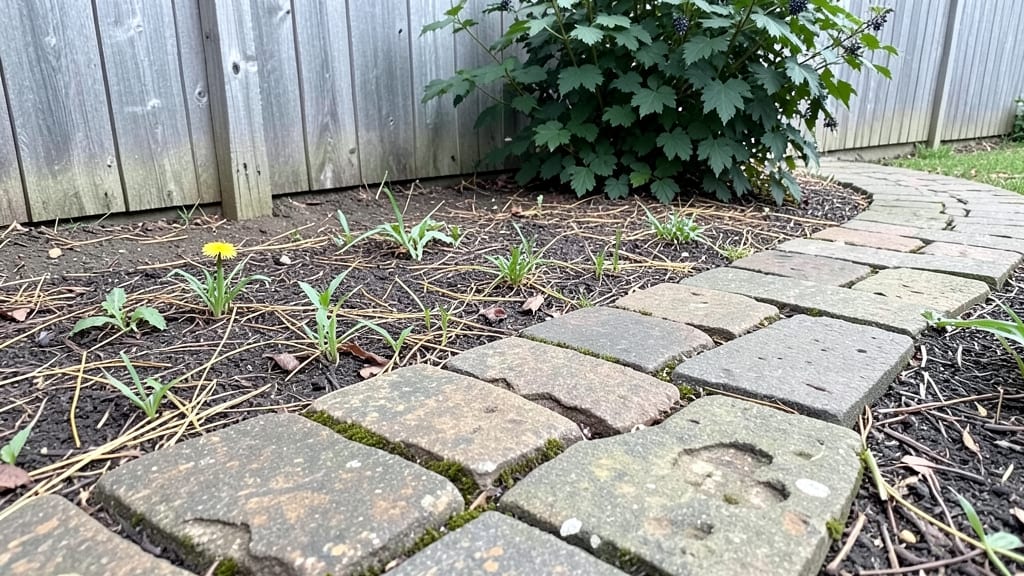
A cobblestone garden path transforms tired lawns into storybook charm with just a few strategic stones. 🌿 I've walked countless paths that felt like stepping into a fairy tale—those uneven, weathered stones create character no gravel or mulch ever could.
The best part? You don't need a landscaper to make it happen. My first path took a weekend and cost less than $200, yet it's the most photographed feature of my garden.
The secret lies in the stones themselves—look for flat, durable flagstone or fieldstone in earthy tones that blend with your landscape. A 4-inch-thick sand base and 2-inch gravel bed keep it stable, while a slight crown (higher in the middle) prevents water pooling.
For a rustic look, leave gaps filled with moss or wildflowers, or go for a tighter fit with polymer sand for a polished finish. Either way, the result ages beautifully over time.
What you'll love most is how the path frames your garden like a painting. Pair it with creeping thyme underfoot for a fragrant carpet, or let hostas and ferns spill over the edges for lush contrast.
The stones stay cool underfoot in summer and won't wash away in heavy rain. Plus, they're nearly maintenance-free—just occasional weeding between the gaps. Once installed, it becomes the star of your outdoor space.
Whether you're lining a vegetable patch, connecting garden beds, or creating a grand entrance, cobblestones adapt to any scale. The key is starting small—maybe a 3-foot-wide path first—so you can refine your technique before committing to a full yard. Trust me, the before-and-after photos will make it worth every stone.
📚 In This Guide
- What you need
- Instructions
- Tips and common mistakes
- Wrapping up and next steps
What you need
- ● Cobblestones: 100–150 per square yard (depending on size; 4–6" diameter is ideal). Choose flat, uniform stones for a polished look.
- ● Base Materials: Crushed gravel (2–3 inches deep) – 1 cubic yard per 10 linear feet of path.
- ● Sand (1–2 inches deep) – ½ cubic yard per 10 linear feet for leveling.
- ○ Landscape fabric (optional but recommended) – 1 roll covers ~100 sq. ft.
- ● Bedding: Polymeric sand (½ bag per 10 sq. ft.) or fine gravel to lock stones in place.
- ● Edging: Metal or plastic edging strips (2–3 feet long per linear foot of path) or natural stone borders.
- ● Shovel & spade (for digging and leveling).
- ● Wheelbarrow (to haul gravel and sand).
- ● Rubber mallet (to tap stones into place).
- ● Level (to ensure your path stays even).
- ● Measuring tape & string line (for marking layout).
- ● Safety gear: Gloves, knee pads, and goggles (because DIY magic isn’t pain-free!).
- ○ Optional: Plate compactor (for ultra-firm base) or a rubber tamper (for smaller projects).
- ● Clear the area of weeds, rocks, or debris (pro tip: 💡 Rent a sod cutter if removing grass!).
- ● Check local building codes—some areas require permits for hardscaping.
- ● Plan your path’s width (2–3 feet is standard) and length to calculate materials accurately.
- ● Test cobblestone placement in a dry run—mismatched gaps = extra work!
Step-by-Step instructions for building a cobblestone garden path
Here’s the method I’ve used to create durable, visually striking paths that last decades—no special tools required.
🪴 Step 1: Mark and Excavate the Path Layout
Start by outlining your path with spray paint or a garden hose, keeping the width between 24 and 36 inches for comfortable walking. A 4-foot length works well for most garden sections. Use a shovel to dig down 4 to 6 inches, removing grass, weeds, and loose soil. The depth ensures your cobblestones sit flush with the surrounding ground.
I like to slope the edges slightly outward to prevent water pooling. Test the depth by laying a cobblestone in the trench—it should sit just below the surrounding soil level. If you hit hardpan or rocks, break them up with a pickaxe or rent a soil auger for stubborn spots.
💧 Step 2: Create a Compacted Base Layer
Spread 2 inches of coarse sand across the trench and level it with a 2x4 board or rake. This layer prevents future settling. Next, add 3 inches of crushed gravel (like #57 stone) and tamp it down firmly with a hand tamper or plate compactor. You want this base as solid as concrete—it’s what keeps your path stable for years.
Here’s the thing—skip the sand if your soil drains poorly. Instead, use 1 inch of landscape fabric over the trench before adding gravel. This blocks weeds while allowing water to drain. After compacting, double-check the level with a 4-foot level—adjust high spots by adding more gravel, low spots by removing excess.
☀️ Step 3: Lay the Cobblestones with Precision
Begin at one end, placing cobblestones in a herringbone or staggered pattern (I prefer herringbone for durability). Leave ½-inch gaps between stones for sand or mortar. Use a rubber mallet to tap each stone into place—this ensures they sit flush without cracking. For curves, cut cobblestones with a masonry saw or angle grinder with a diamond blade.
Watch for uneven spots: if a stone sits higher than its neighbors, gently lift it and add a thin layer of sand underneath. Avoid walking on the path while adjusting—every step can shift stones. Once all stones are in place, sweep coarse sand into the gaps, pressing it in with a broom until it fills completely. For extra stability, mix portland cement into the sand (1 part cement to 3 parts sand) to create a stronger bed.
✂️ Step 4: Secure the Path and Blend the Edges
After 24 hours, lightly mist the path with water to settle the sand or mortar. For high-traffic areas, apply a polyurethane sealer to protect against freeze-thaw cycles. I use a saturating sealant for extra durability, reapplying every 2-3 years. To soften the transition to lawn or mulch, edge the path with landscape fabric and top with 3 inches of mulch or ground cover plants like creeping thyme.
Don’t skip the final sweep—remove any sand buildup on the cobblestones’ surfaces. Over time, this debris can create tripping hazards. If you notice gaps widening after a few months, top off with more sand or mortar mix. The key is patience: let the path settle for a week before heavy use to ensure long-term stability.
Tips & tricks for perfect cobblestone garden paths
A few key strategies that'll transform your cobblestone path from functional to show-stopping.
Precision in Step 1: Use a 4-foot level to check your trench's depth and slope before adding any base materials. I've learned the hard way that even a slight dip can cause water pooling—test by pouring water along the trench after digging. The edges should drain outward naturally. For extra accuracy, rent a laser level if you're working with long paths or complex curves.
Base Layer Secret: When compacting the 3 inches of crushed gravel in Step 2, work in 6-inch sections and overlap each pass by half. This creates a uniform, solid foundation without weak spots. I like to use a plate compactor for larger areas, but a heavy-duty tamper works too. The goal is to achieve the density of concrete—if you can't push a 2x4 board into the base more than ¼ inch, you're good to go.
Pattern Pro Tip: For the herringbone pattern in Step 3, start with a center stone and work outward in diagonal rows. This creates natural tension that prevents shifting. If you're new to patterns, lay out a few stones first on a flat surface to visualize the layout before committing to the trench. For curves, cut stones using a diamond blade and always wear safety goggles—these stones don't forgive mistakes.
24-Hour Rule: That 24-hour curing period before sealing is non-negotiable for durability. During this time, keep the path dry—even light rain can weaken the sand or mortar bed. If you're working in humid conditions, extend the curing time by another 12 hours. This waiting period is what transforms your path from temporary to timeless. Trust me on this.
Pro Tips for Cobblestone Garden Path
- A few key strategies that'll transform your cobblestone path from functional to show-stopping.
- Precision in Step 1: Use a 4-foot level to check your trench's depth and slope before adding any base materials.
- Base Layer Secret: When compacting the 3 inches of crushed gravel in Step 2, work in 6-inch sections and overlap each pass by half.
Frequently asked questions
Got questions about creating or maintaining a cobblestone garden path? Here are some of the most common ones—and their answers—to help you get started or troubleshoot along the way.
How do I choose the right cobblestones for my garden path?
The best cobblestones for a garden path are typically flat, durable, and weather-resistant. Look for natural stones like bluestone, granite, or limestone—they’re sturdy and age beautifully. Avoid overly porous stones (like sandstone) if your climate is wet, as they may crack or absorb moisture. Pro tip: Visit a local stone yard to test textures and colors in your outdoor space before buying!
How long does it take to install a cobblestone path?
Installation time varies based on path length and complexity, but a standard 10-foot path (about 3-4 feet wide) usually takes 1-2 days for a DIYer. If you’re laying a curved or sloped path, add extra time for precision. For a professional installer, expect 4-8 hours of labor. Pro tip: Plan for drying time—if using mortar, wait 24-48 hours before walking on it!
Is a cobblestone path more expensive than other materials like gravel or pavers?
Yes, cobblestone paths tend to be 20-50% pricier than gravel or concrete pavers upfront. However, they offer long-term durability and timeless curb appeal that can boost your home’s resale value. For example:
- Gravel: $1–$3 per sq. ft.
- Concrete pavers: $4–$10 per sq. ft.
- Cobblestones: $6–$15 per sq. ft. (varies by stone type and labor).
How do I prevent weeds from growing between cobblestones?
Weeds love sneaking into gaps! To keep them at bay:
- Use landscape fabric under the stones (leave edges exposed to prevent moisture buildup).
- Apply a natural weed barrier like gravel or sand between stones.
- Regularly pull weeds manually or spray with a vinegar-water solution (1:1 ratio).
What should I do if my cobblestones start shifting or sinking?
Shifting stones usually mean the base wasn’t compacted enough or erosion occurred. Fix it by:
- Lift the loose stones and recompact the base with a plate compactor.
- Add a layer of coarse sand or crushed stone (1-2 inches) and re-level.
- Replace any cracked or broken stones with matching ones.
Wrapping up and next steps
A cobblestone garden path isn’t just a walkway—it’s a statement of timeless elegance that transforms any outdoor space. Whether you’re drawn to its rustic charm or practical durability, this project blends creativity with functionality, offering a lasting upgrade for your garden.
With the right materials and a bit of patience, you’ll create a pathway that feels like stepping into a storybook.
Ready to take the next step? Start by sketching your design, gathering supplies, and embracing the process. Even small sections can make a big impact—so grab your tools and let your garden path become the heart of your outdoor haven! 🌿✨