
Tools
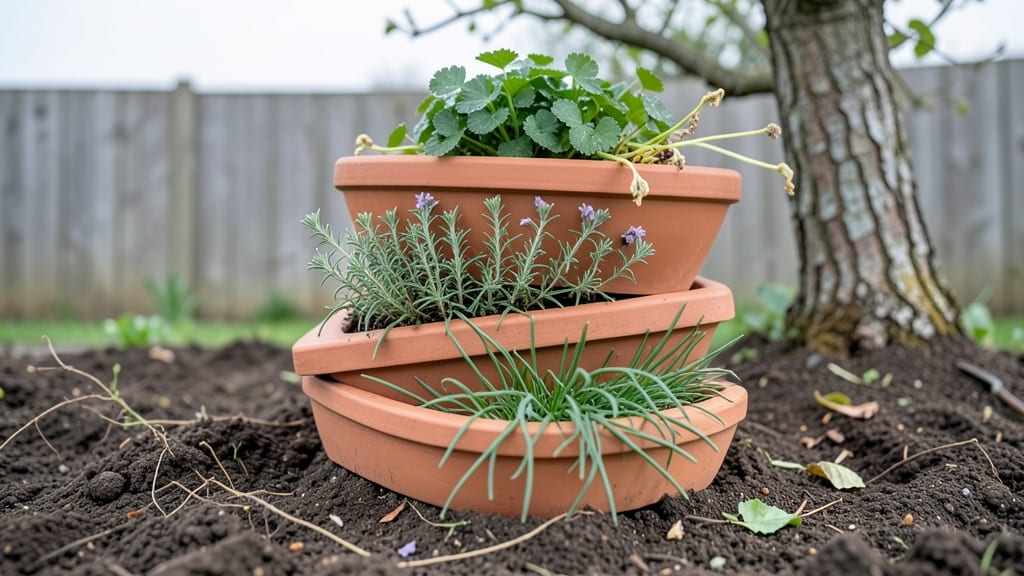
My garden tier planter transformed my tiny balcony into a lush vertical oasis—no extra square footage needed. 🌿 The moment I stacked those layers, I realized how much more I could grow in the same space, and the way plants spill over each other creates this magical waterfall effect that neighbors keep asking about.
You don’t need fancy setups to make it work—just sturdy planters, good drainage holes, and plants that thrive in similar light conditions. I started with succulents on the bottom (they handle drought), trailing petunias in the middle (for color), and herbs on top (easy access for cooking).
The key is matching plant heights so nothing gets overshadowed.
By summer’s end, you’ll have a thriving vertical garden that saves space, cuts water use, and becomes the centerpiece of your patio or balcony. The best part? You can move the whole setup if you need to—no permanent installation required. Here’s how to set yours up right.
Works for modern balconies, cottage-style gardens, or even urban rooftops. The only limit is your imagination—and how many layers you stack!
📚 In This Guide
- What you need
- Instructions
- Tips and common mistakes
- Wrapping up and next steps
What you need
- ● Wooden planks or cedar boards – 2-4 pieces, 1x6 or 1x8 inches wide, 8-12 feet long (cedar resists rot and pests!)
- ● Screws or decking nails – 1.5-2 inches long, galvanized or stainless steel (rust-proof for longevity!)
- ● Wood glue – 1 small bottle (for extra reinforcement)
- ● Drill & drill bits – 1/8" and 3/16" for pilot holes
- ● Sandpaper (80-120 grit) – To smooth rough edges
- ○ Exterior paint or wood sealant – Optional but recommended for weatherproofing
- ● Landscape fabric or hardware cloth – To line the bottom and prevent soil loss
- ● Potting soil or garden mix – Enough to fill all tiers (calculate ~1-2 cubic feet per tier)
- ● Drainage holes tool – Drill bit or spade bit (for pre-drilling holes if not using pre-made planters)
- ● Pre-cut planter boxes – Save time with store-bought cedar or composite tiers
- ● Casters or wheels – For mobility (add 4 small wheels per tier)
- ● Built-in watering system – Drip irrigation kit or self-watering reservoir
- ● Decorative trim or staining – For a polished, custom look
- ● Trellis or lattice panels – For climbing plants (attach to sides)
- ● Basic woodworking skills – Or patience for learning!
- ● Outdoor workspace – With access to power tools (or a friend with them)
- ● Safety gear – Gloves, goggles, and ear protection
- ● Level or measuring tape – For even stacking and precise cuts
How to assemble a garden tier planter for vertical growth
Here’s how I build stackable planters that maximize space without sacrificing beauty.
🪴 Step 1: Select and Prepare the Tier Planter
Start by choosing a 4-tier plastic or wooden planter with built-in drainage holes. If yours lacks holes, use a drill to add at least 4 holes per tier—this prevents root rot and keeps water flowing freely between layers. Place a drainage tray beneath the bottom tier to catch excess water and protect surfaces.
Clean the planter thoroughly with mild soap and water to remove any factory residue or dust. This step is critical—dirt or debris left behind can clog drainage holes or introduce pests. Let it dry completely before adding soil.
🌱 Step 2: Fill Each Tier with Quality Soil
Use 1 gallon of lightweight potting mix per tier—this ensures proper drainage while retaining enough moisture for roots. Avoid garden soil; it compacts in containers and suffocates plants. Mix in ½ cup perlite or vermiculite per gallon to improve aeration and prevent soil from becoming waterlogged.
Fill each tier ¾ full, leaving 1 inch of space at the top. This prevents soil from spilling over when watering and gives plants room to grow without crowding. Press the soil down lightly with your fingers to remove air pockets, but don’t compact it too tightly.
🌿 Step 3: Plant Your Chosen Specimens
Select plants suited for container growing, like herbs, succulents, or shallow-rooted vegetables. For a 4-tier planter, I recommend 1-2 plants per tier to avoid overcrowding. Dig a hole in each tier twice as wide as the root ball and place the plant at the same depth it was in its original container.
Gently firm the soil around the roots to eliminate air gaps. Water each tier deeply until water runs out the drainage holes—this settles the soil and ensures roots make contact with moisture. Avoid overwatering now; let the excess drain completely before placing the next tier on top.
☀️ Step 4: Position and Maintain for Optimal Growth
Place your tier planter in a location with at least 6 hours of sunlight daily. Most tier planters are lightweight, so a small table or balcony railing works perfectly. If using herbs or vegetables, rotate the planter quarter-turn weekly so all sides receive even light—this prevents plants from leaning toward the sun.
Water from the top tier downward, allowing moisture to trickle through each layer. Check the bottom tier’s soil daily—if it feels dry ½ inch below the surface, water all tiers. Overwatering is the biggest mistake; let the soil dry slightly between waterings to prevent root rot.
✂️ Step 5: Prune and Harvest for Long-Term Success
Monitor plants for yellowing leaves or leggy growth—these are signs of overcrowding or insufficient light. Pinch back leggy stems to encourage bushier growth, and harvest herbs or vegetables regularly to promote continuous production. For example, snip basil leaves just above a pair of leaves to stimulate new growth.
Every 2-3 months, refresh the top 1-2 inches of soil with fresh potting mix to replenish nutrients. This simple step keeps plants thriving without the need for heavy fertilizers. If pests appear, isolate the affected tier and treat with neem oil or insecticidal soap—both are safe for edible plants.
Tips & tricks for perfect garden tier planters
A few simple strategies will transform your tier planter from good to extraordinary—let me share what I've learned after years of experimenting.
Drainage is Non-Negotiable: In Step 1, when drilling holes, make them ¼-inch in diameter—this size prevents soil from washing out while ensuring proper drainage. For extra insurance, place a layer of landscape fabric over the holes before adding soil. This keeps soil in place while allowing water to flow freely. I learned this the hard way after watching soil clog my drainage holes!
The Soil Mix Makes All the Difference: When preparing your 1 gallon of potting mix per tier in Step 2, add ¼ cup of compost to each gallon for extra nutrients. This boosts plant growth without compromising drainage. For containers, I always use a mix that's 70% potting soil, 20% perlite, and 10% compost—this ratio works perfectly for tier planters.
Plant Placement Strategy: In Step 3, place your tallest plants in the bottom tier and shortest in the top. This creates a natural cascading effect while ensuring all plants get adequate light. For herbs like basil or thyme, I place them in the top tier where they'll get the most light, while lettuce or spinach go in the bottom tier where they'll stay cooler.
Watering Wisdom: When watering from the top tier downward in Step 4, let the water completely drain through all tiers before placing the next one on top. I use the "finger test" method: stick your finger ½ inch into the bottom tier's soil—if it's dry, water all tiers. If it's still damp, wait another day. Overwatering is the #1 killer of container plants!
Pro Tips for Garden Tier Planter
- A few simple strategies will transform your tier planter from good to extraordinary—let me share what I've learned after years of experimenting.
- Drainage is Non-Negotiable: In Step 1, when drilling holes, make them ¼-inch in diameter—this size prevents soil from washing out while ensuring proper drainage.
- The Soil Mix Makes All the Difference: When preparing your 1 gallon of potting mix per tier in Step 2, add ¼ cup of compost to each gallon for extra nutrients.
Frequently asked questions
What’s the best way to arrange plants in a tiered planter?
Start with the heaviest, tallest plants at the bottom to prevent tipping, then layer lighter, smaller plants upward. For example, place herbs or leafy greens (like basil or lettuce) at the top, while heartier veggies (tomatoes or peppers) go in the middle. Pro tip: Ensure each tier has proper drainage to avoid waterlogging!
How often should I water a garden tier planter?
Watering frequency depends on your climate, but check soil moisture daily during hot spells. Top tiers dry faster—test with your finger: if the top inch feels dry, it’s time to water. Use a drip irrigation system or watering can with a long spout to reach all layers evenly. Early morning is ideal to reduce evaporation.
Are tiered planters worth the investment over traditional raised beds?
Absolutely—if space is limited! Tiered planters maximize vertical growing, perfect for balconies or small yards. They’re also great for urban gardeners or those with limited mobility. However, they require more frequent monitoring (watering, pests) and may need sturdier supports. For large-scale gardening, a traditional raised bed might still be better.
How do I prevent pests in a tiered planter?
Pests love tiered planters because of their cozy layers! Prevent issues with these tips:
- Copper tape around edges deters slugs and snails.
- Use row covers for delicate plants.
- Plant pest-repelling herbs (like mint or marigolds) in the top tier.
- Inspect undersides of leaves regularly for early signs of aphids or spider mites.
Can I move a tiered planter once it’s planted?
Moving a fully planted tiered planter is possible but tricky. Water the plants thoroughly 24 hours before moving to reduce stress. Lift gently (or use a dolly for heavier setups) and avoid disturbing roots. Best time to move: Early morning or overcast days. If possible, replant in sections to minimize shock.
Wrapping up and next steps
Transforming small spaces into lush, thriving gardens is easier than ever with a garden tier planter—your secret weapon for maximizing greenery without sacrificing space! 🌱 Whether you’re a seasoned gardener or just starting out, these stackable layers offer versatility, organization, and endless creative potential.
The key takeaway? Start small, think vertically, and watch your garden grow—literally layer by layer!
Ready to dive in? Grab your materials, sketch your design, and begin stacking today! Your dream compact garden awaits—just a few tiers away. 🌿✨