Shrubs
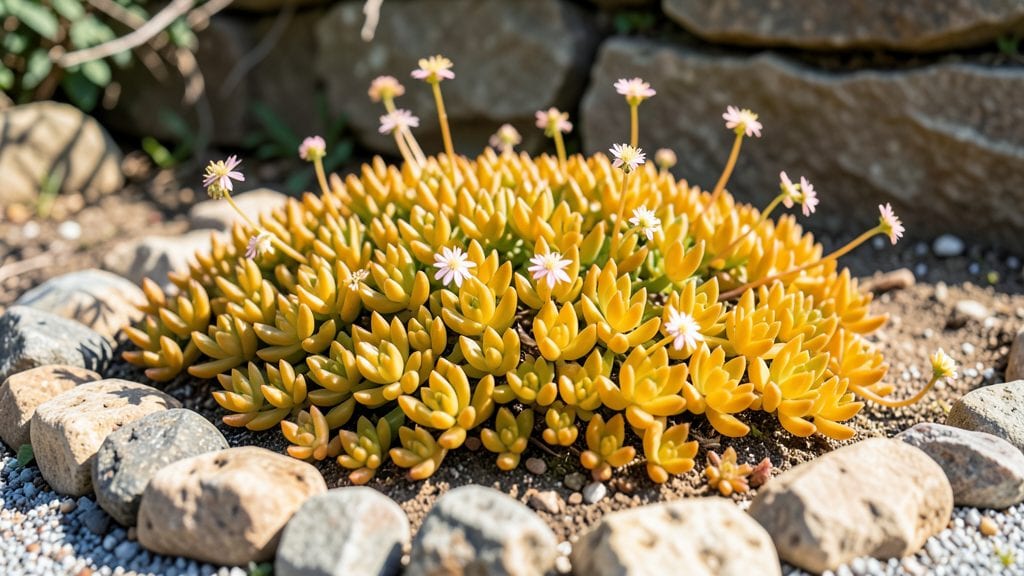
Browse these pictures of small rock gardens for inspiration before turning your cozy corner into a breathtaking miniature landscape.
I stumbled upon this idea after filling a shallow tray with smooth river rocks, a few succulents, and a dusting of moss—what started as a whimsical experiment became my front porch's new centerpiece. The textures alone—rough stones against velvety moss—create depth without needing space.
You don’t need expensive supplies to get started. A shallow container (anything from a 5-gallon pot to a repurposed baking dish) works perfectly, along with small pebbles, flat stones, and drought-tolerant plants like sedum or thyme.
The key is playing with height variation: place larger stones at the back, smaller ones in the front, and tuck plants into the crevices. Even a 12-inch square can look like a mature landscape with the right arrangement.
What you’ll end up with is a garden that stays low-maintenance yet feels alive—moss stays green year-round, succulents thrive on neglect, and the stones keep weeds at bay. The best part?
You can theme it: a Zen garden with smooth river rocks, a fairy garden with tiny figurines, or a drought-proof design for sunny patios. The possibilities are limited only by your imagination.
Works in sun or shade, on balconies or windowsills, and even indoors near a bright window. Once you see how quickly these tiny spaces come together, you’ll want to create one for every empty corner. Let’s get those stones arranged!
📚 In This Guide
- What you need
- Instructions
- Tips and common mistakes
- Wrapping up and next steps
What you need
- ● Container: A shallow tray, ceramic pot, or wooden box (12"–24" wide, with drainage holes).
- ● Gravel or Pebbles: 5–10 lbs of smooth river rocks (¼"–1" diameter) for the base layer.
- ● Soil: 2–3 bags of cactus/succulent mix (or well-draining potting soil).
- ○ Moss (optional): Sheet moss or reindeer moss for texture (1–2 small bundles).
- ● Small Plants: Miniature succulents, sedum, or mosses (3–5 plants, 2"–4" tall).
- ○ Decorative Elements: Tiny figurines, driftwood, or colored sand (optional but fun!).
- ● Garden trowel or small shovel
- ● Gloves (to protect your hands from sharp rocks)
- ● Spray bottle (for misting moss)
- ● Measuring tape or ruler (for precision)
- ● Twine or decorative stones (to outline paths, if desired)
- ● A sunny or partially shaded spot (6+ hours of light for succulents).
- ● Patience! Layering takes time, but the results are worth it. 💡
- ● Access to water (gentle misting is key for moss and delicate plants).
Instructions for designing a stunning small rock garden
Creating a miniature rock garden transforms even a tiny space into a serene, textured landscape.
Select and Arrange Your Base Materials
Choose a shallow container or ground area with good drainage—rock gardens hate soggy roots. I like to use a 6-inch-deep tray for small designs or a raised bed for larger ones. Spread a 2-inch layer of gravel first to ensure water drains freely. This prevents root rot and keeps your moss and tiny plants thriving.
Next, layer coarse sand over the gravel to create a stable foundation. Press it down lightly with your hands until it feels firm but not compacted. The sand helps distribute moisture evenly while allowing excess water to filter through. This step is crucial—skipping it leads to uneven growth and waterlogged spots later.
Build Your Rock Framework
Arrange your stones in a way that mimics natural landscapes. Start with larger rocks as the backbone of your design, placing them first to create height and structure. I often use flat stones to form pathways or borders, while rounder rocks add softness to the scene. Leave gaps between rocks—these will become homes for your moss and small plants.
Play with different rock sizes and textures to create visual interest. For example, smooth river rocks contrast beautifully with jagged slate. Step back occasionally to check your layout—what looks balanced up close might feel off from a few feet away. This is where the magic happens: a well-placed rock can elevate your entire design.
Add Moss and Tiny Plants
Once your rocks are in place, fill the gaps with sheet moss or small ground covers like creeping thyme or miniature sedum. Press the moss gently into the soil to secure it, ensuring it covers the roots of any plants you add. Moss thrives in shaded or partially shaded areas, so place it where rocks might cast shadows. If using plants, space them 2-3 inches apart to allow room for growth.
Water everything thoroughly after planting to help the moss and soil settle. Avoid overwatering—rock gardens should stay lightly moist, not soggy. You’ll know you’ve done it right when the moss looks vibrant and the soil feels damp but not waterlogged. This step sets the foundation for your garden’s long-term health.
Refine with Fine Details
Add small pebbles or sand to fill any remaining gaps between rocks and plants. This creates a polished, natural look while preventing weeds from taking over. Use a fine-mesh sieve to sprinkle sand evenly—it’s easier than trying to scatter it by hand. Pay attention to the edges of your garden; a neat border makes the whole design look intentional.
Finally, add tiny accents like miniature pine cones, small shells, or even a tiny figurine if you’re feeling whimsical. These details add personality and draw the eye to focal points. Step back one last time to check for balance—your rock garden should feel cohesive, not cluttered. This is the moment where your vision comes to life.
Maintain for Long-Term Beauty
Water your rock garden 2-3 times per week, depending on your climate. The key is to keep the soil lightly moist but never waterlogged. I like to water in the early morning so excess moisture evaporates during the day. Over time, you’ll notice which areas dry out faster—adjust your watering schedule accordingly.
Remove any weeds that pop up immediately, as they compete with your moss and plants for nutrients. A small hand trowel works perfectly for this task. Every few months, check your rocks and plants to ensure nothing has shifted or grown out of place. A little maintenance keeps your rock garden looking fresh and inviting for years to come.
Tips & tricks for perfect miniature rock gardens
Creating a stunning small rock garden isn't just about placing rocks—it's about crafting a harmonious miniature landscape that feels intentional and alive. Here are the insights that will elevate your design from basic to breathtaking.
Drainage is Non-Negotiable: In Step 1, that 2-inch layer of gravel isn't just decorative—it's the foundation of your garden's health. If your container doesn't have drainage holes, add a layer of broken terracotta pots at the bottom before the gravel. This creates an extra barrier against waterlogging, which can quickly turn your moss into a soggy mess. I've seen beautiful designs ruined in weeks because of poor drainage, so don't skip this critical layer.
Rock Selection Creates Drama: When building your framework in Step 2, think about the "story" your rocks tell. Place the largest, most interesting stones first—they become your garden's focal points. For contrast, I recommend pairing smooth river rocks with textured slate. The interplay between these surfaces creates visual depth that flat arrangements simply can't match. Remember, rocks should feel like they've been there for centuries, not like they were just placed.
Moss Placement Matters More Than You Think: In Step 3, when you're adding sheet moss, resist the urge to cover every inch. Leave small gaps between rocks and moss to create natural-looking shadows and highlights. Press the moss edges gently into the soil to secure it, but don't pack it down too firmly—this can suffocate the roots of your tiny plants. For best results, use moss that's already established rather than trying to grow it from spores, which can take years to develop that lush carpet look.
Fine Details Make All the Difference: The tiny accents you add in Step 4 are where your personality shines through. I recommend using a mix of natural elements like pine cones and shells, but don't be afraid to incorporate small garden ornaments that reflect your style. The key is balance—no single accent should overpower the natural elements. Think of these as the punctuation marks in your garden's sentence, adding emphasis where it's needed most.
Pro Tips for Pictures Of Small Rock Gardens
- Creating a stunning small rock garden isn't just about placing rocks—it's about crafting a harmonious miniature landscape that feels intentional and alive.
- Drainage is Non-Negotiable: In Step 1, that 2-inch layer of gravel isn't just decorative—it's the foundation of your garden's health.
- Rock Selection Creates Drama: When building your framework in Step 2, think about the "story" your rocks tell.
Frequently asked questions
Got questions about creating or caring for your small rock garden? You’re not alone! Here are some of the most common queries—plus quick, practical answers to help you rock your tiny landscape (pun intended).
What are the best small plants for a rock garden?
Opt for drought-tolerant, low-growing plants like sedum, hens-and-chicks, thyme, or miniature roses. These thrive in rocky soil, require minimal water, and add texture. Avoid heavy foliage—stick to plants that mimic a natural, airy look!
How long does it take to build a small rock garden?
Most DIY rock gardens take 1–3 days for a basic setup, depending on size and complexity. Planning (layout, drainage) can add a few hours. Pro tip: Start small—even a 2’x2’ bed can look stunning! If you’re ambitious, larger designs may take a weekend.
Do rock gardens need frequent watering?
Not at all! The key is proper drainage—rock gardens should be watered deeply but infrequently (every 1–2 weeks, depending on climate). Mulch with gravel or pebbles to retain moisture and suppress weeds. Overwatering can rot roots, so let the soil dry between sessions.
Can I use any rocks, or do they need to be a specific type?
While smooth, flat stones (like slate or river rocks) work best for aesthetics, any non-sharp rocks (lava rock, granite, or even recycled concrete) can be used. Avoid pointy or unstable rocks—they can harm plants or shift over time. Local landscaping suppliers often sell affordable, garden-safe options!
How do I keep pests out of my rock garden?
Rock gardens are naturally pest-resistant, but slugs, snails, and aphids might still visit. Prevent them with:
- Diatomaceous earth (sprinkle lightly around plants)
- Neem oil spray (natural insect repellent)
- Copper barriers (for slugs)
Wrapping up and next steps
Creating a small rock garden is a rewarding way to bring nature’s beauty into your space—no matter how limited! Whether you’re drawn to the serene elegance of moss, the textured charm of stones, or the whimsical touch of tiny plants, these miniature landscapes offer endless creativity in tiny packages. 🌿✨
Ready to turn your vision into reality? Start small—pick a corner, gather your materials, and let your green thumb (or rock-loving spirit!) guide you. Your tiny masterpiece is just a few stones away!