
Tools
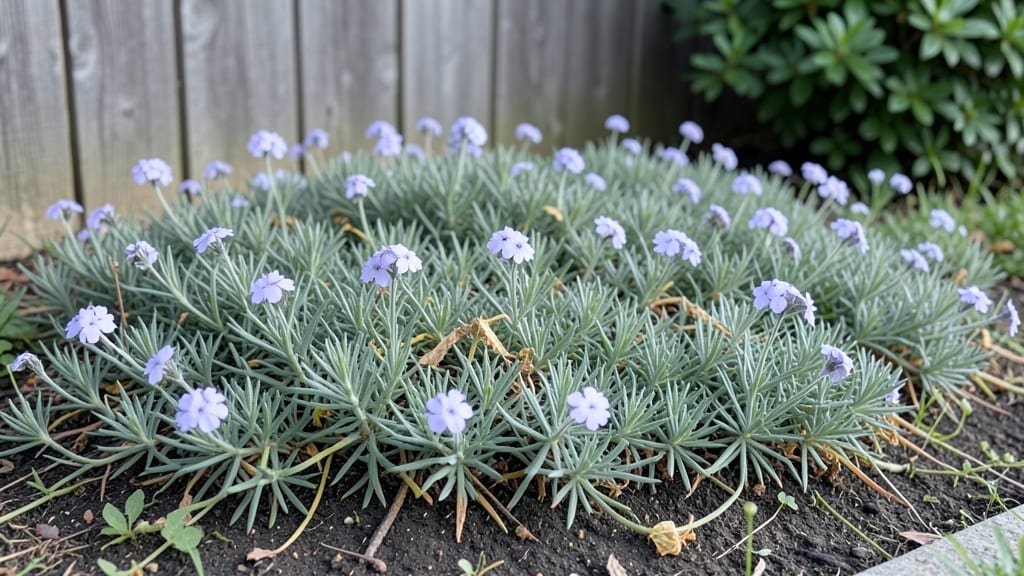
A creeping phlox garden transforms bare spots into a fragrant, ever-blooming carpet that outshines most annuals. 🌿 I’ve used it to soften rocky slopes, frame pathways, and even spill over container edges—once established, it’s nearly indestructible while smelling like a spring meadow.
The key is choosing the right variety for your light and climate, then letting it spread naturally without heavy-handed pruning.
This isn’t just a ground cover—it’s a four-season player. Plant it in early spring or fall for roots to establish before summer heat, and you’ll get blooms from late spring through early summer, with occasional fall reblooms if deadheaded.
Pair it with dwarf conifers, sedum, or ornamental grasses for texture contrast, or let it mingle with hostas and ferns for a woodland feel. The fragrance alone makes it worth the effort.
By midsummer, your garden will hum with bees while looking like a professional landscaper’s secret. The plants stay compact (6–12 inches tall) but spread aggressively, so divide them every 3–4 years to keep them vigorous.
No fertilizers or fancy amendments needed—just good drainage and occasional trimming after flowering to tidy up. For slopes, it prevents erosion better than mulch ever could.
Works in full sun to partial shade, thrives in zones 3–9, and even tolerates drought once established. Whether you’re filling a sunny border, a shady woodland edge, or a container cascade, creeping phlox delivers color with almost no effort.
Let’s design your fragrant, low-maintenance masterpiece—starting with the perfect spot and plant pairings.
📚 In This Guide
- What you need
- Instructions
- Tips and common mistakes
- Wrapping up and next steps
What you need
- ● Creeping phlox plants: 6–12 plants (depending on garden size; spacing ~12–18 inches apart)
- ● Choose varieties like Phlox subulata (hardy zones 3–8) for best results
- ● Soil amendments: 5 lbs. compost (per 10 sq. ft. of garden bed)
- ● 2 lbs. perlite or coarse sand (for drainage)
- ● Fertilizer: 10–10–10 balanced fertilizer (1 tbsp. per plant at planting)
- ● Tools: Garden trowel or spade
- ● Garden gloves (for protection)
- ● Watering can or hose with a gentle spray nozzle
- ● Pruners (for shaping and deadheading)
- ● Mulch (2–3 inches of pine straw or shredded bark to retain moisture)
- ● Edging stones or metal borders (to define garden beds)
- ● Slow-release rose or flower fertilizer (for mid-season feeding)
- ● Ground cover plants (like ajuga or heuchera) for companion planting
- ● Landscape fabric (to suppress weeds in larger beds)
Step-by-Step guide for planting a thriving creeping phlox garden
This fragrant, sun-loving perennial spreads effortlessly while delivering months of vibrant blooms.
🌱 Step 1: Select the Perfect Planting Site
Creeping phlox thrives in full sun—choose a location receiving at least 6-8 hours of direct sunlight daily. The plant tolerates USDA Hardiness Zones 3-9, making it adaptable to most climates. I always test the soil's drainage by digging a 12-inch deep hole—if water pools after 30 minutes, amend with 2-3 inches of coarse sand or perlite to prevent root rot.
This ground cover performs best on gentle slopes or flat areas where it can spread naturally. Avoid low-lying spots where winter frost collects. You'll see the most vibrant blooms when planted in well-draining soil with a slightly acidic to neutral pH (6.0-7.0). Test your soil's pH using a simple kit before planting—amend with sulfur if needed to lower pH or lime to raise it.
🪴 Step 2: Prepare the Soil and Plant with Proper Spacing
Loosen the soil to a depth of 12 inches using a garden fork, breaking up any compacted layers. Mix in 2-3 inches of compost to enrich the soil without overwhelming the plants with excess nitrogen, which can reduce flowering. For 4 plants, create planting holes 8-12 inches apart—closer spacing encourages faster ground cover but may reduce bloom size.
Remove each plant from its container and gently tease the roots apart if they're circling. Place the root ball 1 inch deeper than it was in the pot—this ensures stability and encourages strong root development. Backfill with soil, pressing lightly to eliminate air pockets. Water immediately after planting to settle the soil and eliminate air gaps around the roots.
☀️ Step 3: Establish a Watering Routine for Strong Growth
Water newly planted creeping phlox deeply once weekly for the first 4-6 weeks to encourage deep root growth. You'll know you're watering correctly when the top 2-3 inches of soil feel dry to the touch. Avoid overhead watering, which can promote fungal diseases. Instead, use a soaker hose or drip irrigation system placed at the base of the plants.
Once established, creeping phlox is remarkably drought-tolerant. After the first season, water only during prolonged dry spells—typically every 2-3 weeks in most climates. Mulch with 2-3 inches of organic mulch (like shredded bark) to retain moisture, suppress weeds, and regulate soil temperature. Keep the mulch 2 inches away from plant stems to prevent rot.
✂️ Step 4: Prune and Maintain for Continuous Blooms
Deadhead spent blooms immediately after they fade to encourage a second flush of flowers in late summer. Use clean, sharp pruners to cut back stems to the first set of healthy leaves. I always prune on a dry morning to reduce the risk of disease transmission. After the second bloom cycle, cut back the entire plant by one-third to promote bushier growth and prevent legginess.
In early spring, before new growth appears, trim back any dead or damaged stems to 1 inch above the soil line. This rejuvenates the plant and prevents it from becoming woody. Fertilize lightly in early spring with a balanced, slow-release fertilizer (10-10-10) to support new growth. Avoid heavy feeding, which can reduce flowering and encourage excessive foliage growth.
⏰ Step 5: Overwinter and Prepare for Next Year's Blooms
Creeping phlox is hardy and typically requires no winter protection in most climates. However, in Zone 3 or colder, apply a 2-3 inch layer of mulch after the first hard frost to insulate the roots. Remove the mulch in early spring once new growth appears. In warmer climates (Zones 8-9), water sparingly during winter dormancy to prevent root rot.
In late winter, before new shoots emerge, divide mature plants every 3-4 years to rejuvenate growth and prevent overcrowding. Dig up sections with a sharp spade, ensuring each division has 3-5 stems. Replant divisions immediately in prepared soil and water thoroughly. You'll see vigorous regrowth within 4-6 weeks, signaling successful division.
Tips & tricks for perfect creeping phlox gardens
These garden-tested strategies will help you transform your planting into a thriving, fragrant display that blooms beautifully year after year.
Sunlight Strategy: The 6-8 hours of direct sunlight mentioned in Step 1 is non-negotiable for vibrant blooms. I've seen phlox planted in partial shade produce sparse, weak flowers—it's worth moving containers or adjusting landscape features to guarantee full sun exposure. In hotter climates, provide afternoon shade to prevent leaf scorch while maintaining morning sun for photosynthesis.
Soil Preparation Secret: When loosening soil to that critical 12-inch depth in Step 2, don't just break up the top layer—focus on creating vertical channels for roots to penetrate. I use a garden fork to create small trenches between planting holes, which improves drainage and helps roots establish faster. This is especially important if your soil naturally compacts easily.
Watering Wisdom: The 2-3 inch soil dryness test in Step 3 is your best friend. I've learned the hard way that creeping phlox can tolerate drought once established, but overwatering in the first 4-6 weeks will drown those developing roots. Use your finger to check moisture at the 2-3 inch depth—this is where the roots will be growing, not just the surface.
Pruning Precision: That one-third cutback after the second bloom cycle in Step 4 is about more than just aesthetics—it's a growth reset. I time my pruning for early fall to allow new growth to harden off before winter. Use clean pruners and make cuts at a 45-degree angle just above a leaf node to encourage bushier regrowth next spring.
Pro Tips for Creeping Phlox Garden
- These garden-tested strategies will help you transform your planting into a thriving, fragrant display that blooms beautifully year after year.
- Sunlight Strategy: The 6-8 hours of direct sunlight mentioned in Step 1 is non-negotiable for vibrant blooms.
- Soil Preparation Secret: When loosening soil to that critical 12-inch depth in Step 2, don't just break up the top layer—focus on creating vertical channels for roots to penetrate.
Frequently asked questions
Got questions about growing a stunning creeping phlox garden? You’re not alone! Here are answers to the most common queries to help you cultivate vibrant, low-maintenance blooms with ease.
When is the best time to plant creeping phlox?
Plant creeping phlox in early spring or early fall when soil temperatures are cool (50–60°F). Avoid extreme heat or frost—these conditions stress young plants. For container gardens, you can plant anytime, but spring kickstarts faster growth. Pro tip: Amend soil with compost for richer roots!
How long does it take for creeping phlox to bloom after planting?
Patience pays off! Most varieties bloom in the first year if planted in spring, but expect full coverage and peak color by year two or three. Early spring plantings often flower sooner than fall ones. Deadhead spent blooms to encourage repeat flowering.
Are creeping phlox deer- or rabbit-resistant?
While not fully deer-proof, creeping phlox is less appealing than many other perennials. Deer may nibble if other food is scarce. For extra protection, use repellent sprays or plant alongside thorny shrubs (like barberry). Rabbits usually avoid it too—unless your garden is a buffet!
Can I grow creeping phlox in containers or hanging baskets?
Creeping phlox thrives in containers 12+ inches deep with well-draining soil. Use hanging baskets for a cascading effect, but ensure they’re protected from harsh winds. Water regularly—containers dry out faster than garden beds. Mix with trailing thyme for a fragrant combo!
Why isn’t my creeping phlox blooming?
Common culprits include too much shade (needs 6+ hours of sun), over-fertilizing (focus on phosphorus for blooms), or crowded roots. Prune back stems in early spring to encourage new growth. If leaves look yellow, check for overwatering—creeping phlox prefers moderate moisture.
How do I propagate creeping phlox?
Easy! Divide mature clumps in early spring or fall—gently lift, separate roots, and replant sections 12–18 inches apart. You can also take stem cuttings in summer: dip in rooting hormone, plant in moist soil, and keep humid until roots form (4–6 weeks). Share with friends—it’s a crowd-pleaser!
Wrapping up and next steps
Creating a creeping phlox garden is a rewarding way to bring vibrant color and sweet fragrance to your outdoor space with minimal effort! 🌸 These hardy, low-maintenance perennials thrive in sun or partial shade, offering year-round interest—from early spring blooms to lush foliage in winter.
Whether you’re a seasoned gardener or just starting, this fragrant beauty is the perfect addition to borders, slopes, or rock gardens.
Ready to transform your yard? Start small—pick a sunny spot, gather your materials, and plant your creeping phlox today! With a little care, you’ll enjoy a burst of color that keeps giving back, season after season.