
Shrubs
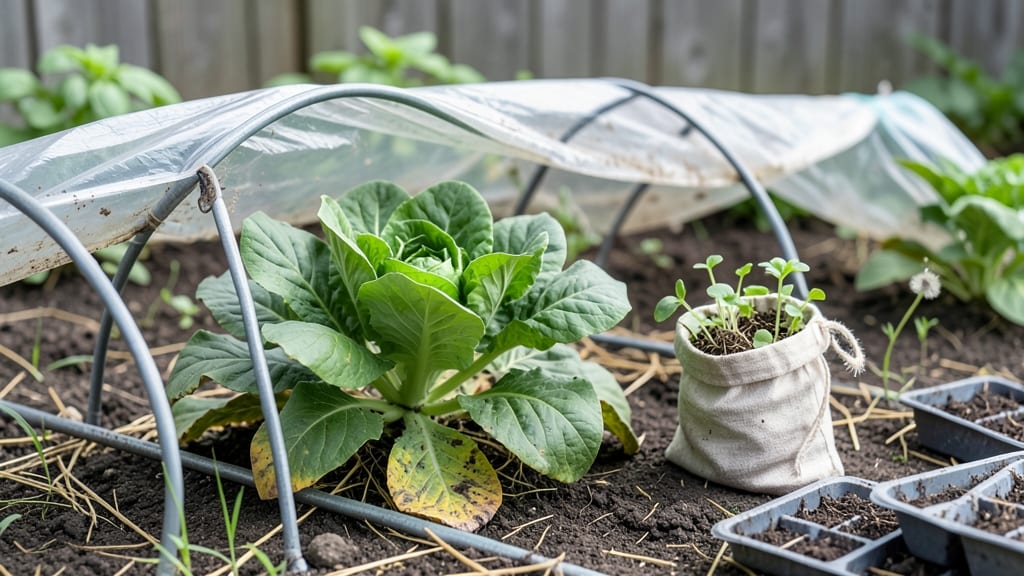
My low tunnel gardening setup transformed my tiny backyard into a four-season harvest zone—no matter how cold or windy it gets outside. 🌱 The secret lies in that simple arched frame with clear plastic, which traps heat, shields plants from pests, and lets me grow greens even when snow is still on the ground.
I built mine with PVC pipes and old shower curtains, but you can use whatever’s sturdy and affordable. The results? Lettuce in December, spinach in March, and tomatoes that ripen weeks ahead of schedule.
You’ll need minimal supplies: a lightweight frame (6-8 feet long, 3-4 feet wide), clear plastic sheeting, and some zip ties or staples to secure everything.
Most gardeners skip the fancy hoops and use old window frames or even sturdy branches—whatever keeps the plastic arched high enough for you to walk through. The best part?
It’s a one-time investment that pays off every growing season, whether you’re protecting seedlings from late frosts or extending harvests into fall.
Inside that cozy microclimate, your plants grow faster and stronger. I’ve seen kale bolt into new leaves within days of moving it under the tunnel, and strawberries that ripen in early spring instead of waiting for summer.
The protection also keeps critters out—no more raccoons digging through my salad or slugs devouring my seedlings overnight. You’ll harvest 30-50% more than in an open garden, and the soil stays warmer, so roots grow deeper and plants handle transplanting like pros.
Works for any space—balconies, raised beds, or even a single row in your backyard. The key is keeping the plastic snug but not suffocating, venting on warm days, and rotating crops to prevent disease. Once you try it, you’ll wonder how you ever grew without one!
📚 In This Guide
- What you need
- Instructions
- Tips and common mistakes
- Wrapping up and next steps
What you need
- ● Low Tunnel Frame: PVC pipes (½” to 1” diameter) or galvanized steel hoops (4–6 ft long, depending on tunnel length)
- ● Bendable wire (16–18 gauge) or rebar (for DIY hoops, ~½” diameter)
- ● Covering: Frost cloth (30–50g weight, 4–6 ft wide, length = tunnel length + 2 ft)
- ○ Optional but recommended: Clear plastic sheeting (4–6 mil thickness) for extra heat retention
- ● Fasteners & Supplies: Zip ties or plastic clips (100–200, depending on size)
- ● Staple gun + staples (if securing fabric directly to soil)
- ● Ground stakes or U-shaped anchors (to secure tunnel edges)
- ● Prerequisites: Flat, raised bed or in-ground plot (4–6 ft wide, length varies)
- ● Healthy shrubs or plants (choose cold-hardy varieties if extending seasons)
- ● Ventilation kit (mesh panels or zippered vents for airflow)
- ● Thermometer/hygrometer (to monitor microclimate)
- ● Drip irrigation kit (for consistent moisture under cover)
- ● Reflective mulch (aluminum foil or bubble wrap to boost warmth)
Step-by-Step instructions for building a low tunnel garden
Here's how to create a simple, effective low tunnel for extending your growing season—no fancy tools required.
🪴 Step 1: Choose and Prepare Your Planting Site
Select a 4-foot-wide, 8-foot-long area in your garden with well-draining soil. Low tunnels work best on slightly raised beds or flat ground where water won't pool. I always clear the area of weeds and rocks first—those can poke through the cover and damage plants.
Loosen the top 6 inches of soil with a garden fork or tiller to improve drainage and root growth. Mix in 2-3 inches of compost from your ingredients list to boost fertility. The goal is loose, aerated soil that lets roots spread easily. If your soil is heavy clay, add a handful of perlite per square foot to help with drainage.
🌱 Step 2: Plant Your Crops for Maximum Protection
Sow or transplant cold-hardy crops like lettuce, spinach, kale, or radishes—these thrive in the cooler temperatures a low tunnel creates. Space plants according to their mature size, but leave 6-12 inches between rows to allow airflow under the cover. I like to plant in 4 rows (since we're covering 4 plants) with 12 inches between each row for easy access.
Water the plants thoroughly before covering them. The soil should be moist but not soggy—you want the tunnel to trap humidity, not create a swamp. If your plants are young, give them a light mulch of straw to protect their stems from potential cold snaps before adding the cover.
☀️ Step 3: Assemble the Low Tunnel Frame
Use the 4-foot-long PVC pipes to create a simple arch. Bend one pipe into a U-shape (about 3 feet wide at the base and 2 feet tall at the peak) and secure it at each end with the 2 stakes per corner. Repeat with the second pipe to create a second arch, spacing them 4 feet apart along the 8-foot length of your bed.
Connect the arches with zip ties along the top to create a continuous frame. The goal is a semi-cylindrical shape that's tall enough for you to walk through but low enough to trap heat. Leave 6 inches of space between the frame and the soil to prevent crushing plants when you cover them.
💧 Step 4: Cover and Secure the Tunnel
Drape the 4x8-foot row cover fabric over the frame, allowing it to touch the ground on all sides. Secure it tightly with clips or staples every 12 inches along the edges to prevent wind from lifting it. The fabric should be taut but not stretched—this ensures maximum heat retention without tearing.
Leave the center 2 feet of one 8-foot side uncovered to create a door. You'll want to open this briefly each morning to ventilate and prevent condensation buildup. On sunny days, prop the fabric partially open to regulate temperature—too much heat can scorch tender plants.
⏰ Step 5: Maintain and Monitor Your Low Tunnel
Check your tunnel daily for condensation on the fabric. If you see heavy dew or water dripping onto plants, lift the cover for 10-15 minutes to air it out. Overwatering is a common mistake—low tunnels trap moisture, so water only when the top inch of soil feels dry. I use a moisture meter to avoid guesswork.
Remove any weeds that pop up under the cover—they'll compete with your crops for nutrients. Every 2-3 weeks, open the tunnel completely for 30 minutes to harden off your plants and prevent them from becoming too dependent on the protected environment. This step is critical for transitioning plants to outdoor conditions later in the season.
Tips & tricks for perfect low tunnel gardening
Here's what I've learned after building and maintaining low tunnels for years—these tricks will help you avoid common pitfalls and maximize your growing season.
Soil Preparation Matters: In Step 1, when you're loosening the top 6 inches of soil, don't just scratch the surface—really break up that soil to improve drainage. I like to add a handful of coarse sand to heavy clay soils to prevent compaction. This loose, aerated soil is what allows roots to spread and absorb nutrients efficiently, especially under the protective cover where moisture accumulates. The extra 2-3 inches of compost you mix in should be well-aged—fresh compost can burn tender roots.
Plant Spacing Secret: In Step 2, when planting your 4 rows with 12-inch spacing, remember that plants will grow taller under the tunnel. I often space my radishes and lettuce a bit closer (8-10 inches) since they'll mature faster, but leave that full 12 inches for kale and spinach which will grow more vigorously. This prevents overcrowding and makes harvesting easier—you don't want to be wrestling with plants when you're trying to pick fresh greens.
Frame Stability Tip: When assembling your frame in Step 3, make sure those 4-foot arches are properly secured with the 2 stakes per corner. I've seen tunnels collapse when stakes weren't driven deep enough—aim for at least 8 inches into the ground. Also, leave that 6-inch clearance between frame and soil to prevent crushing stems when you cover everything. Pro tip: Use a level when setting up your arches to ensure they're straight and even.
Ventilation Strategy: The 10-15 minute ventilation you do daily in Step 5 is crucial, but don't forget to adjust based on weather. On days above 70°F, I often ventilate for 20-30 minutes to prevent overheating. Watch your plants—if leaves start wilting or turning yellow, that's your sign to open up the tunnel. The 30-minute hardening off every 2-3 weeks is also key—it helps plants adjust to outdoor conditions when you're ready to remove the tunnel later in the season.
Pro Tips for Low Tunnel Gardening
- Here's what I've learned after building and maintaining low tunnels for years—these tricks will help you avoid common pitfalls and maximize your growing season.
- Soil Preparation Matters: In Step 1, when you're loosening the top 6 inches of soil, don't just scratch the surface—really break up that soil to improve drainage.
- Plant Spacing Secret: In Step 2, when planting your 4 rows with 12-inch spacing, remember that plants will grow taller under the tunnel.
Frequently asked questions
Got questions about low tunnel gardening?
You’re not alone! Here are answers to the most common queries to help you grow confidently—no matter your experience level.
What’s the best time of year to set up a low tunnel?
Low tunnels extend your growing season, so set them up before the first frost in fall or early in spring—even in late winter for cold-hardy crops like spinach or kale. For year-round use, install them in early spring and remove them after harvest (or leave them up with winter crops).
Will a low tunnel work in my climate?
Low tunnels thrive in most climates, from cold northern regions to mild coastal areas. In hot zones, use shade cloth or ventilate during peak sun. For extreme cold (<10°F), opt for heavy-duty plastic or add insulation like straw bales. Test with a thermometer to monitor temps—aim for 40–85°F for optimal growth.
Are low tunnels worth the cost compared to row covers?
Here’s the breakdown:
Low Tunnel
Row Cover
Higher upfront cost ($50–$200) but reusable for years.
Cheaper ($10–$50 per cover) but single-use per season.
Better for long-term crops (tomatoes, peppers) or winter protection.
Ideal for quick crops (lettuce, radishes) or lightweight setups.
How do I keep pests out without chemicals?
Low tunnels naturally deter pests like rabbits and deer, but insects can still sneak in. Try these tricks:
- Reflective tape or aluminum foil around the edges to confuse flying pests.
- Companion planting (e.g., marigolds near tomatoes) inside the tunnel.
- Neem oil or soapy water sprays for soft-bodied bugs (aphids, spider mites).
- Beneficial insects like ladybugs or lacewings released before pests arrive.
How do I prevent my plants from overheating in summer?
Low tunnels can trap heat like a greenhouse! To cool things down:
- Roll up one side of the plastic on warm days (like a window).
- Use shade cloth (30–50%) over the top if temps hit 85°F+.
- Water early morning to reduce heat buildup.
- Choose heat-tolerant crops (okra, Swiss chard) for summer tunnels.
Wrapping up and next steps
Low tunnel gardening is your secret weapon for extending your growing season, maximizing small spaces, and protecting delicate plants—no matter the weather! 🌱 With just a few materials and a little creativity, you can transform even the tiniest yard or balcony into a thriving, year-round garden.
Whether you're a seasoned gardener or just starting out, the key is to start small, experiment, and enjoy the process.
Ready to take the next step? Pick one crop or plant to test in your low tunnel this week—your future harvest will thank you! 🌿